Tag Archive for: enable

North Korea Using Social Engineering to Enable Hacking of Think Tanks, Academia, and Media


The Federal Bureau of Investigation (FBI), the U.S. Department of State, and the National Security Agency (NSA), together with the Republic of Korea’s National Intelligence Service (NIS), National Police Agency (NPA), and Ministry of Foreign Affairs (MOFA), are jointly issuing this advisory to highlight the use of social engineering by Democratic People’s Republic of Korea (DPRK a.k.a. North Korea) state-sponsored cyber actors to enable computer network exploitation (CNE) globally against individuals employed by research centers and think tanks, academic institutions, and news media organizations. These North Korean cyber actors are known to conduct spearphishing campaigns posing as real journalists, academics, or other individuals with credible links to North Korean policy circles. The DPRK employs social engineering to collect intelligence on geopolitical events, foreign policy strategies, and diplomatic efforts affecting its interests by gaining illicit access to the private documents, research, and communications of their targets.

North Korea’s cyber program provides the regime with broad intelligence collection and espionage capabilities. The Governments of the United States and the Republic of Korea (ROK a.k.a. South Korea) have observed sustained information-gathering efforts originating from these North Korean cyber actors. North Korea’s primary military intelligence organization, the Reconnaissance General Bureau (RGB), which has been sanctioned by the United Nations Security Council, is primarily responsible for this network of actors and activities.

We assess the primary goals of the DPRK regime’s cyber program include maintaining consistent access to current intelligence about the United States, South Korea, and other countries of interest to impede any political, military, or economic threat to the regime’s security and stability.

Currently, the U.S. and ROK Governments, and private sector cyber security companies, track a specific set of DPRK cyber actors conducting these large-scale social engineering campaigns as Kimsuky, Thallium, APT43, Velvet Chollima, and Black Banshee. Kimsuky is administratively subordinate to an element within North Korea’s…

Source…

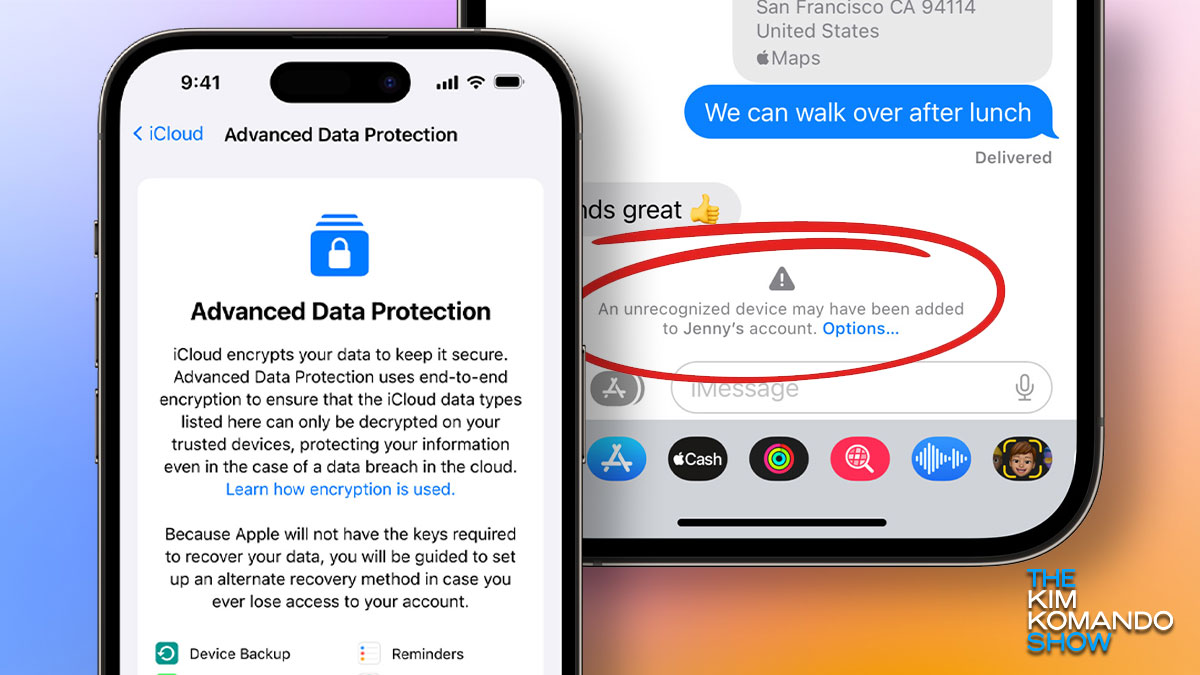
How to enable Apple’s Advanced Data Protection


You should always have a backup of precious photos and essential personal files. It would be best to back up your mobile phone before upgrading its operating system, so you don’t lose anything important. Tap or click for three things to look for in a cloud backup.

If you have an iOS device, there is a setting that lets you automatically back it up to iCloud at predetermined intervals. This is great if you have trouble remembering to do it on your own.

But backing up data to iCloud wasn’t as secure as you’d think. Until now. Read on for details on Apple’s new security setting to protect your data.

Here’s the backstory

Apple recently released an update for iOS devices, bringing the operating system to version 16.2. Pro tip: To improve your iPhone’s battery life, disable these three features now.

The latest iOS version adds a much-needed security tool. Previously, your backups to iCloud weren’t encrypted. If you wanted to encrypt your backups locally, you had to do so through iTunes on your computer.

That has changed with the addition of Advanced Data Protection with iOS 16.2. This means that any iCloud backup benefits from end-to-end encryption.

This is something that many advocacy groups have been fighting for. The Electronic Frontier Foundation asked Apple to add this security feature years ago.

How to enable Apple’s Advanced Data Protection

It is always a good idea to keep your phone updated to the latest version. If you are still on a previous iOS version, here’re how to update your device: go to Settings > General Software Update > Download and Install.

Once you are on iOS 16.2, you can enable the new Advanced Data Protection setting to encrypt iCloud backups. Here’s how:

  • Open Settings.
  • Tap your name.
  • Look for the iCloud option and tap it.
  • Under the Device Backups option, tap on iCloud Backup and make sure the Back Up This iPhone is toggled on.
  • Then, go back to the previous screen and scroll until you see Advanced Data Protection and select it.
  • Tap Turn On Advanced Data Protection.

Keep reading

Four data…

Source…

‘Black Proxies’ Enable Threat Actors to Conduct Malicious Activity


Threat actors have been spotted using criminal proxy networks to obfuscate their illegal activities by hiding behind hijacked IP addresses and using the same to create an appearance of legitimacy.

The findings come from security researchers at DomainTools, who have said that while these networks were initially used as part of botnets, their lucrative nature has turned them into their own criminal enterprises.

Describing the new threat in an advisory published on Thursday, the DomainTools team said it spotted a new and particularly dangerous proxy service called ‘Black Proxies,’ which is being marketed to other cyber-criminals for its reliability, scope and vast number of IP addresses.

“Black Proxies market themselves as having over 1,000,000 residential and other proxy IP addresses ‘from all around the world.’ The scope and scale of these new offerings show just how large their claimed pool of IP space is,” DomainTools wrote.

“Upon further examination through the service, their pool of IP addresses listed in fall of 2022 ‘online’ comes in at just over 180,000 IPs, which is still a factor larger than the traditional services based on other types of tactics and botnets.”

According to the advisory, the Black Proxies’ scale is significant because of not only their focus on both the traditional forms of IP proxying but also their use of compromised websites for their services.

“Ultimately, in the cybercrime ecosystem, there are a host of specialized services designed to enable malicious activity,” reads the report.

The researchers also added that understanding these newer malicious proxy services and how they facilitate the efforts of other cyber-criminals is critical in order to combat them.

“For defenders looking to protect their organizations and users from these types of proxy network services, the key is to focus on defense in depth, applying different detection methods to help identify anomalous and potentially malicious behavior,” concluded the report.

Malicious domains were also at the center of a typosquat campaign uncovered in October, which highlighted attacks targeting Windows and Android users mimicking 27 brands.

Source…

How to enable UPnP on routers


Universal Plug and Play (UPnP) is a protocol that lets the devices on the same network communicate with each other. It allows apps on other devices to connect with yours like Xbox, etc. Printer in a shared network, and other common devices without wired connectivity work on UPnP protocol to communicate with each other. In this guide, we show how to enable UPnP on routers of different brands.

How to enable UPnP on routers

How to enable UPnP on routers

If you want to enable UPnP on your router, you can do it by following the below steps based on your router manufacturer.

Let’s get into the process of each router and enable UPnP.

Enable UPnP on NETGEAR router

Netgeat UPnP

To turn on UPnP on your NETGEAR router,

  • Open a web browser on your computer, enter http://www.routerlogin.net in the address bar, and press Enter.
  • Enter router user name and password. The default username for the NETGEAR router is admin and the default password is password.
  • It takes you to the home page or router configuration. Click on the ADVANCED tab and select Advanced Setup.
  • You will see many options there. Select UPnP at the bottom.
  • Now, check the button beside Turn UPnP On to turn it on. Save the changes and restart your router to apply the changes.
  • You can disable the UPnP whenever you want by following the same method.

This is how you can enable or disable UPnP on the NETGEAR router.

Enable UPnP on the D-Link router

Enable UPnP on Dlink router

To enable UPnP on your D-Link router,

  • Open a web browser on your computer and enter 192.168.0.1 in the address bar and press Enter.
  • Enter the username and password to log in. The default username is admin and the default password is blank. You just have to type admin in the username text field and press Enter.
  • Click on the Settings tab or on the Tools tab based on your model.
  • If you just have the Settings tab, you can just enable UPnP by toggling the button beside UPnP under Advanced Settings.
  • If you clicked on the Tools tab, select Misc on the left.
  • Check the button beside Enabled under the UPnP Settings section to enable it.
  • Click Apply and Continue to save settings. Then, restart your browser to apply them. If you want to disable UPnP, you can follow the same method.

Enable UPnP on the ASUS router

Enable UPnP on Asus router

To enable UPnP on your ASUS router,

  1. Log in to…

Source…